obsidian发布hugo-quartz
目录
简介
这里是用 obsidian 发布到 hugo 的 quartz 主题详细操作步骤.
quartz 主题优点如下:
- 支持双链语法
- 有双链图
操作步骤
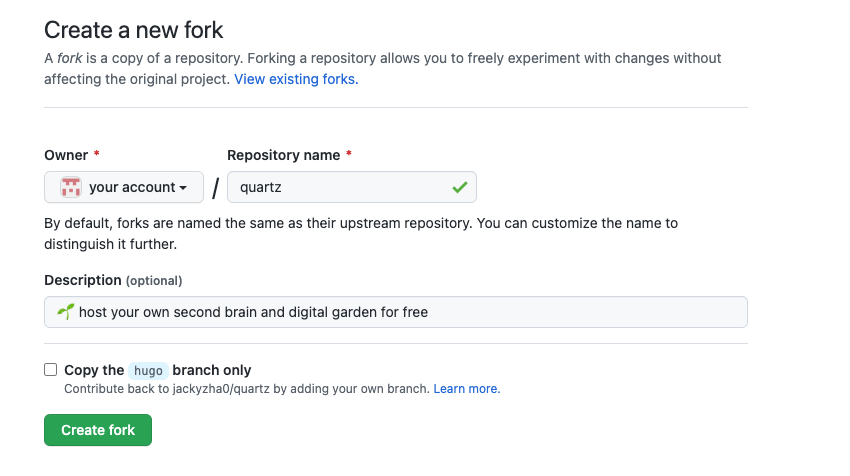
fork 代码库
- 访问 hugo 模板仓库 jackyzha0/quartz: 🌱 host your own second brain and digital garden for free (github.com)
- fork 仓库
- git 克隆到本地
git clone https://github.com/YOUR-USERNAME/quartz
初始化动作
移除
content内的所有内容编辑
data/config.yaml目录下name: kentxxq enableRecentNotes: true GitHubLink: https://github.com/kentxxq/quartz description: "kentxxq's digital garden" page_title: "🪴 kentxxq's digital garden" links: - link_name: Blog link: https://www.kentxxq.com - link_name: GitHub link: https://github.com/kentxxq编辑
config.tomlbaseURL = "https://blog.kentxxq.com/" ignoreFiles = [ "/content/templates/*", "/content/private/*", "/content/附件/*.md", ]注释掉
.github/workflows/docker-publish.yaml文件.gitignore过滤 private 文件夹content/private修改
layouts/partials/date-fmt.html里的日志格式{{if .Date}} {{.Date.Format "2006-01-02"}} {{else if .Lastmod}} {{.Lastmod.Format "2006-01-02"}} {{else}} Unknown {{end}}修改
.github/workflows/deploy.yaml文件name: Deploy to GitHub Pages on: push: branches: - hugo jobs: deploy: runs-on: ubuntu-20.04 steps: - uses: actions/checkout@v2 with: fetch-depth: 0 # Fetch all history for .GitInfo and .Lastmod - name: Build Link Index uses: jackyzha0/hugo-obsidian@v2.20 with: index: true input: content output: assets/indices root: . - name: Setup Hugo uses: peaceiris/actions-hugo@v2 with: hugo-version: "0.96.0" extended: true - name: Build run: hugo --minify - name: Deploy uses: peaceiris/actions-gh-pages@v3 with: github_token: ${{ secrets.GITHUB_TOKEN }} publish_dir: ./public publish_branch: master # deploying branch cname: blog.kentxxq.com # 先用blog来做测试
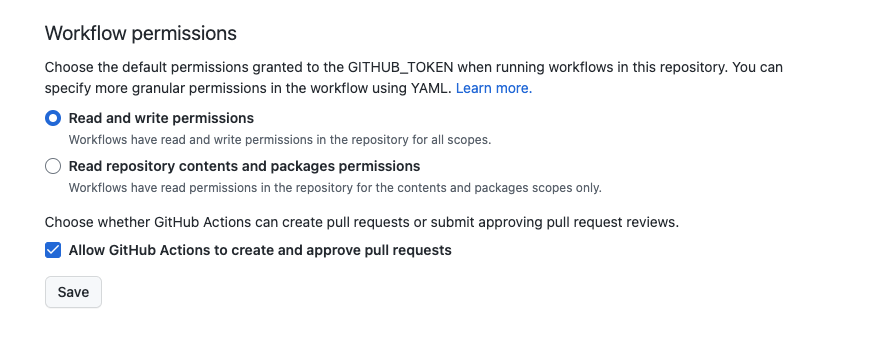
配置 githubPage
到你的 quartz 仓库调整配置
进入
Settings > Action > General > Workflow Permissions并选中Read and Write Permissions
使用说明
vault应该创建在 content 下面_index.md是 quartz 的首页设置 - 编辑器 - 显示 - 显示 frontmatter, 方便我们迅速查看调整 tag, 标题之类的内容
做一个模板,方便你以后用
---
title: "{{title}}"
tags:
  - blog
---
推送代码后
- 配置自定义域名解析,例如
blog.kentxxq.com使用 cname 解析到kentxxq.github.io - 进入
Settings > Pages > Custom domain > blog.kentxxq.com - 开启 https 证书
Enforce HTTPS